Baby Doll Candy Machine and Safe Box Surprise Eggs Play
Matt Bird writes all sorts of nonsense, but he dedicates a large chunk of his time to writing game walkthroughs.
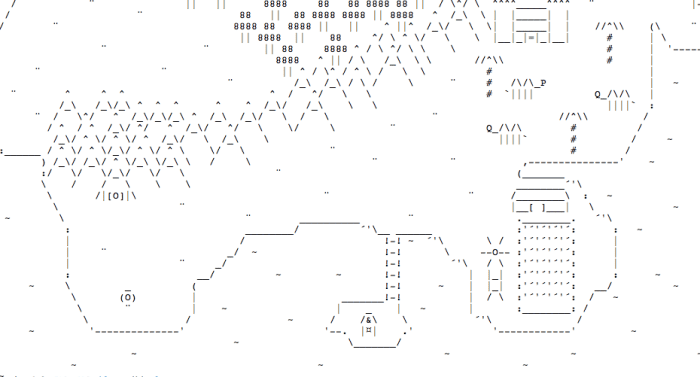
The Map
Welcome to another candy-related odyssey! Processed Box 2 plays rather similarly to the original, but in many ways, it's its own game also. You'll demand a fair amount of skill, and some luck, to go through this text-based wonderland. One time y'all click on the link, you are playing, so off we go!
"Eat All the Candies"
You begin with only this option as you gain a single candy at a fourth dimension. You lot can eat these candies to upgrade your health, simply only when the health bar appears. Information technology won't practise so until you allow the candies to accumulate to a sufficient bespeak, so let your estimator sit down for a while until some other options appear.
"Throw ten Candies on the Basis"
This is an innocuous enough option, but in this game, it serves a purpose. Constantly bung candies onto the floor and you'll send a smiley on a long, circuitous journey. Go on doing it and you'll eventually earn a chocolate bar. Eventually, your little guy will observe a cornucopia of candy; but yous won't get much more out of him past that, so don't bother. (And don't do information technology right at the outset.)
Wait long plenty and yous'll unlock the following options:
- Asking a new feature from the programmer (30 C) - Unlocks Status Bar
- Request another one (5 C) - Unlocks Configuration Tab
- Request once over again (five C) - Unlocks Saving
- Request for something more exciting (5 C) - Unlocks your wellness bar
- Terminal request! (ten C) - Unlocks the Map
The Village
Welcome to your base of operations! The Hamlet serves as your habitation away from home, a sanctuary where y'all can purchase new stuff with your difficult-earned candies. You lot'll visit here frequently, so it's worth noting off the bat that you can only access the cardinal row of stores. The rest of The Village is but for show. (For now, anyway.)
Shop
One of the first places yous tin visit is the Shop. The merchant inside will sell you items in exchange for candy. Return after completing quests later in the game and he'll occasionally have new wares for sale.
- Lollipop (60 C) - There are only iii, and there's no deviation between them, despite what the merchant may claim. Lollipops come in handy shortly, so purchase all three.
- Chocolate Bar (800 C) - Available from the start. Chocolate is used for bartering.
- Leather Boots (300 C) - Available from the start. These boots can be equipped, and you tin can eventually upgrade them with magic.
- Time Band (500 C) - Appears after completing The Desert. The Fourth dimension Ring allows yous to slow down the game during quests then you can react more quickly.
- Leather Gloves (300 C) - Appears after completing The Desert. You can equip, and eventually upgrade, these gloves.
- Merchant's Lid (i,000,000 C) - Click on the hat itself. Multiplies the number of candies yous receive during quests by seven.
The Forge
This dude deals in weapons and a single piece of armor, exchanged for candy. The beginning three weapons can exist bought one later on the other, and it's wise to upgrade early. You lot'll demand this stuff to survive quests. Don't miss the single lollipop sitting higher up his forge.
- Wooden Sword (150 C)
- Iron Axe (400 C)
- Polished Silver Sword (2,000 C)
- Lightweight Body Armor (15,000 C) - Appears after completing The Cavern Entrance
- Scythe (5,000,000) - Appears after speaking to the dragon in The Castle
House (2d From Right)
There's a lollipop sitting atop the cabinet. Open up the chiffonier for some other lollipop. Woo!
Firm (Furthest Right)
A homo/woman in hither will ask you to clean out their cellar. Yous'll demand at least the Wooden Sword to fulfill this request. Listen that yous have to equip the sword via the Inventory tab.
Cellar
This is the easiest dungeon, and very simple to complete with the Wooden Sword alone. Merely watch your guy plow through the rats, one by 1. You lot'll receive The Map for beating the dungeon, thereby unlocking the world map. You can't reenter the Cellar afterwards completing information technology.
The Village
Welcome to your base of operations of operations! The Village serves as your home away from home, a sanctuary where you can buy new stuff with your hard-earned candies. You'll visit here ofttimes, so information technology's worth noting off the bat that you lot tin but admission the central row of stores. The residual of The Village is just for testify. (For now, anyhow.)
Read More From Levelskip
Shop
One of the first places you tin can visit is the Shop. The merchant within volition sell you items in commutation for candy. Return subsequently completing quests later in the game and he'll occasionally accept new wares for sale.
- Lollipop (sixty C) - In that location are only three, and there'due south no departure betwixt them, despite what the merchant may merits. Lollipops come up in handy soon, then buy all 3.
- Chocolate Bar (800 C) - Available from the start. Chocolate is used for bartering.
- Leather Boots (300 C) - Available from the first. These boots can be equipped, and you can eventually upgrade them with magic.
- Fourth dimension Band (500 C) - Appears after completing The Desert. The Time Ring allows you to slow down the game during quests then you tin react more quickly.
- Leather Gloves (300 C) - Appears subsequently completing The Desert. You can equip, and eventually upgrade, these gloves.
- Merchant'southward Lid (i,000,000 C) - Click on the lid itself. Multiplies the number of candies yous receive during quests by seven.
The Forge
This dude deals in weapons and a single slice of armor, exchanged for candy. The first three weapons tin can exist bought one later the other, and information technology's wise to upgrade early. You lot'll demand this stuff to survive quests. Don't miss the unmarried lollipop sitting above his forge.
- Wooden Sword (150 C)
- Atomic number 26 Axe (400 C)
- Polished Argent Sword (2,000 C)
- Lightweight Torso Armor (fifteen,000 C) - Appears afterward completing The Cave Entrance
- Scythe (five,000,000) - Appears after speaking to the dragon in The Castle
House (2d From Right)
There'southward a lollipop sitting atop the chiffonier. Open up the cabinet for another lollipop. Woo!
House (Furthest Right)
A man/adult female in here will inquire you lot to make clean out their cellar. You'll need at least the Wooden Sword to fulfill this request. Mind that you have to equip the sword via the Inventory tab.
Cellar
This is the easiest dungeon, and very simple to complete with the Wooden Sword alone. But watch your guy plough through the rats, one by one. You'll receive The Map for chirapsia the dungeon, thereby unlocking the world map. You tin can't reenter the Cellar after completing it.
You can build a Mill once you reach 10,000 lollipops.
Earth Map
Welcome to the world at large! Y'all're currently in The Hamlet, on the east side of the map. Your next destination is The Desert, but before going there, check the woods just north of the village. Here you'll meet A Lonely House.
A Lonely Business firm
Inside this Lone House is a box. You tin't open up the box; shaking does nothing; breaking the lock is useless; kick the box is meh; speaking to the box is a little insane; luring it with processed even more so. Click all the options and you lot'll be allowed to accept the Candy Box with you. Woo. Back to the map.
A Tree
Hover over the trees east of A Alone Firm to observe a labelled "Tree." Hither you'll find a Squirrel that volition help you in exchange for answering questions correctly. Provide information technology with the post-obit answers for prizes:
- "Yeah" - 20 candies
- "C" - 100 candies
- Your electric current candy count - 500 candies
- "10" - 3 lollipops
- "Floats" - 3 chocolate confined
Later the quiz, the Squirrel volition challenge yous to Tic Tac Toe. This is much easier than information technology looks: merely retrieve "outside the box" and click 3 times below the Tic Tac Toe board, in a horizontal row. The Squirrel will requite you The Third House Key for The Village. All washed. Thank you for playing!
The Desert
Some other dungeon, of sorts. The Desert is equally straightforward as the Cellar, though yous're facing some stronger enemies. Buy an Iron Axe for 400 candies and you'll clear The Desert when y'all're at full health. Beating The Desert will unlock The Lollipop Subcontract, every bit well as the Time Band and Leather Gloves dorsum at the Shop. Buy both when you accumulate enough candy. Beating The Desert also unlocks The Span to the southwest, the Wishing Well to the west, and The Cave Entrance to the far w. We'll get to those in a bit.
While running this quest y'all'll probably discover Desert Birds flitting overhead. If you have an attack that can hit things in the air (I used the random fireballs from the Scarlet Enchanted Gloves) you tin can kill these things and gain a Desert Bird Feather.
Mountain Range
Earlier going anywhere else, browse the mount range on the earth map. Merely s of the forest beyond the mountains, you'll come across a single asterisk. Click on it and yous'll enter the mountains. Climb them to retrieve the Pogostick. The Pogostick allows y'all to leap over obstacles in quests, and the Desert Bird Feather upgrades the Pogostick's jumping capabilities.
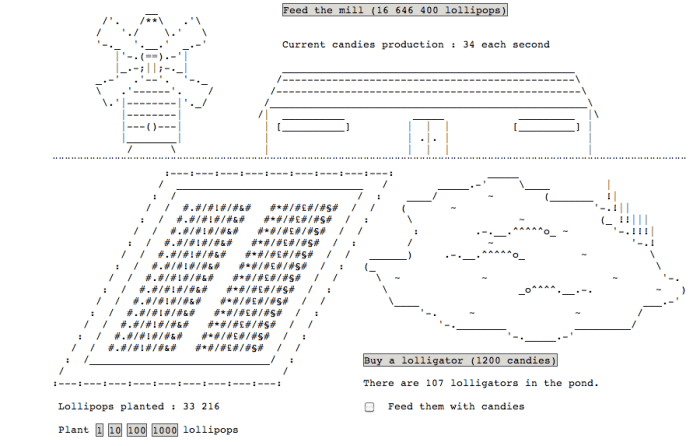
Lollipop Farm
Anyone who played the original Candy Box will call up the Lollipop Farm fondly. Have all those lollipops you lot found in The Village and constitute them. Afterward a long wait, you'll go another lollipop. Plant that as well. With each lollipop you institute, you'll increase the charge per unit at which they grow, to the point where they volition exist actualization in your inventory by the hundreds every 2nd. Practise this early and you'll brand the late game a bang-up deal easier, as lots of people love them their lollipops. The field itself maxes out at 100 lollipops a second.
Once yous reach x,000 lollipops you lot tin build a Manufacturing plant. You tin can thereafter feed the Factory with lollipops and increase your candy production, which I highly recommend doing as early every bit possible.
Accomplish 100,000 lollipops and you tin dig a Swimming. You can then use candies to buy Lolligators for the Pond. Lolligators allow you to convert candies to lollipops; the more Lolligators you have, the faster the conversion rate.
Wishing Well
The Wishing Well is a fun little feature in Processed Box 2. Toss a candy in it and you'll instantly heal your wounds, which is much meliorate than waiting for them to heal on their own. Each time you use this feature the number of candies needed to heal you lot jumps up, though, and so don't waste this insta-healing frivolously.
You tin can likewise toss a lollipop in the well. The well will then convert your lollipop into a candy. Each time y'all do this yous'll proceeds the choice to toss in more lollipops at a higher price; you'll get half equally many candies equally the number of lollipops yous toss in. Non bad.
Y'all can throw chocolate bars in the well. These allow yous to upgrade your items into magical items. These gloves have different properties.
- Gloves change into Pinkish or Red Enchanted Gloves. Pink Enchanted Gloves do will restore your wellness constantly when worn; Blood-red Enchanted Gloves volition randomly launch fireballs at opponents while you're on quests.
- The Octopus Rex Crown changes into the Octopus Rex Crown with Jaspers or the Octopus King Crown with Obsidian. Jaspers launch large fireballs randomly from you; Obsidian will summon an Octopus Male monarch to help you out occasionally. Both are pretty keen.
- The Monkey Wizard Staff changes into the Monkey Wizard Staff (Enchanted). This version will burn spells off with greater frequency.
- The Tribal Spear changes into the Summoning Tribal Spear. It will summon tribal warriors to help you in your travels.
- Knight Torso Armor turns into Enchanted Knight Body Armor. Your resistance increases considerably, but your attack damage is cut in half. Hm.
- The Giant Spoon upgrades to the Giant Spoon of Doom. It hits very hard but does so at an incredibly reduced rate of burn down.
Last, yous tin heave Hurting Au Chocolats into the well. Doing then will grant you a boost to your Ability, Magic, or Health. All iii are cumulative and well worth the loss of a chocolate.
The Bridge
After buying the Polished Silvery Sword, you'll be ready to accept on the Troll and his Bridge. Beat him for a Troll's Bludgeon, which is a strong but dull weapon. Your call on whether to use it or not, though it's powerful enough that I recommend taking the striking to your speed. (If you upgrade one of your items with a chocolate bar and requite it an offensive power, you can probably vanquish the troll without having to buy the Polished Silverish Sword.) You get 500 candies a popular for beating The Span, so information technology's worth grinding for a fiddling while.
Sorceress' Hut
Past The Bridge is this quaint lilliputian hut. Within is a witch who will sell yous a variety of magical items. Scan her shelves to notice a Grimoire and an Avant-garde Grimoire on the top two shelves. You lot can buy these for v,000 and twenty,000 lollipops, respectively; they'll allow you to cast spells in battle. On the bottom shelf is a lollipop.
The last thing of note here is the Cauldron. Buy information technology for a whopping 100,000 lollipops and yous tin use it to brew a variety of helpful potions. Not but is this highly recommended, simply it is besides, at times, pretty much a necessity. The details for brewing are listed at the end of this walkthrough.
The Cave Entrance
The Cave Entrance is a petty strange. It'southward basically a random area where you'll come across strong enemies and the occasional item, such equally a chocolate bar. If you don't experience like troubling with this identify, go straight ahead until you leave the Cave. By going through y'all'll unlock The Woods, to the northeast, and The Pier, to the north.
Ultimately, though, yous'll desire to return here to fight the enemies and explore.
- Octopus King - A very straightforward boxing. Use Health Potions to chew your way through the matter. The Octopus King is strong, only with Armor, you shouldn't have too much trouble killing information technology. Y'all'll win the Octopus King Crown for killing its bearer. You'll likewise win 4,000 candies, making this a battle well worth repeating.
- Monkey Magician - Not straightforward at all. The Monkey Sorcerer will try to avoid y'all while launching magic balls into the air. I similar to equip the Octopus Male monarch Crown with Jaspers and let the fireballs chew away at his HP over time, preferably while using Teleport and the Boots of Introspection (see the 10 Potion, listed in the Brewing department below). You'll win the Monkey Wizard Staff for beating the Monkey Wizard.
- Eye Plug - Non an enemy, but an item. While wandering through The Cave Entrance you may meet arrows painted onto the walls, pointing either left or correct. Follow these arrows and you'll eventually arrive at a chest containing the Heart Plug. This increases your health score by 20 percent.
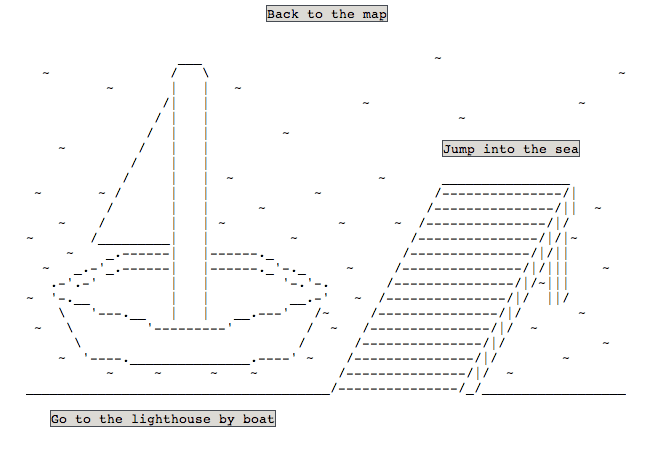
You can take the gunkhole or simply dive into the h2o.
The Pier
You accept ii options hither: You tin take a boat to The Lighthouse, which is perfectly safe, or you can jump off the pier and into the sea. The Lighthouse is, at this point, just a text dump; The Sea is a quest of sorts.
The Sea
This is a foreign identify. Dissimilar most quests, you can navigate up and downward to hitting (or avoid) enemies. The enemies get gradually tougher equally you keep, to the point that you'll eventually face seahorse-ish foes that burn at you from a distance. (You can easily avoid their shots by scraping the lesser.) The primary reason to undergo this journey is to detect a Magical Sponge, located on the seafloor. The Sponge allows you to squeeze yourself down to a smaller size, wherein yous can contrivance incoming shots more than easily.
Return to The Sea once you lot have some more powerful items, or more HP in general. The further you go, the stronger the enemies get, to the bespeak that you'll eventually be facing sharks. Kill ane to go a Beat out Powder, which will triple the output of your lollipops. Egads! (Just avoid the sea serpents, you lot can't kill them.)
Come back withal again once you're strong enough to hands withstand the sharks— probably near the stop of the game—and eventually, you lot'll come across 3 rare sharks with coloured fins. Kill them and you'll get these items in this order: the Magical Blood-red, Dark-green, and Purple Shark Fins. The Red Fin upgrades your Fireball spell; the Dark-green Fin multiplies your lollipop product by another five times; the Purple Fin gives you the Blackness Hole spell. The first two won't take that long to find, merely the Purple Fin requires a lot of swimming and killing to locate.
A BIG difficulty jump here.
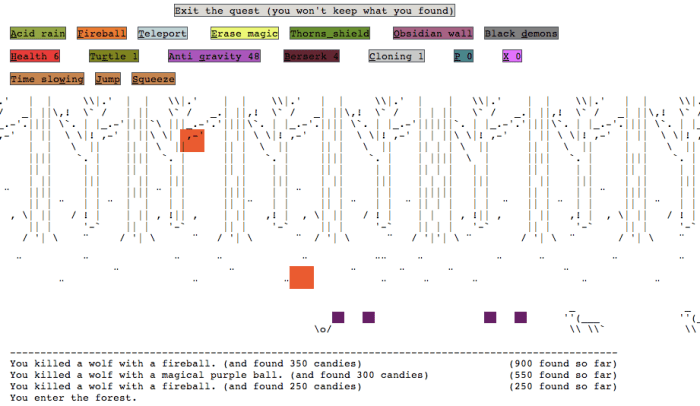
The Wood
Large difficulty jump here. You're facing a combination of strong wolves, ranged tree spirits, and irritating mosquitoes. To get through with relative ease you'll need several magical items. Use the Magical Sponge to shrink beneath the shots of the tree spirits, then equip the Octopus King Crown with Jaspers and the Monkey Wizard Staff (Enchanted). The shots you fire off constantly should slaughter virtually everything in your way, as well equally go along those stupid mosquitoes from annoying y'all too much. Beating The Forest will unlock the Castle Entrance and The Pigsty, simply east of the Castle.
Care for a ton of processed? Equip the Boots of Introspection and Jump your style to the far finish of the screen. If you sit at the spawn point with these items equipped you'll constantly slaughter enemies without being touched yourself. Leave this for a while, and, yeah. Candyyyyy!
The Pigsty
Faaaaalling! The Hole is a weird area that'south filled with spikes. Impact the spikes and you take a ton of impairment. Avoid the spikes. Otherwise, your primary problem here is the tribal warriors within; they're pretty strong at this point, and random magic shots are probably your best bet for taking them downwardly unscathed. (On the plus side, you lot tin can get a Tribal Spear for killing a warrior.) Too here are several chests with bang-up items within; it pays to know that y'all can jump with the J central while trying to get at these items. Much easier than trying to click the push button with your mouse.
- Below the kickoff two spiked floors is a small ledge with a chest. Despite how it looks, you tin can jump to this usually. In the breast is a Heart Pendant. It increases your HP count.
- Fall downward the right side of the map. In that location's a spiked pit below yous with a hole in the heart. Squeeze and autumn through this pigsty to reach a breast containing a Black Magic Grimoire. This Grimoire teaches y'all two powerful spells.
- Fall downward the left side of the map and climb the loma after you first land. Past several sections of spikes is a chest containing a Desert Fortress Key which will open up the fortress in the desert. (Duh.) You need a lot of health to featherbed these spikes without dying.
- At the very bottom is a chest guarded by four warriors. Kill them all to get 3 bars of chocolate.
Got them all? The only way to leave with the items in hand is to fall downwardly the pit on the correct side. Don't go out without doing this or you'll have to go through this area again.
The Desert Fortress
Look familiar? As soon as yous set foot in the Desert Fortress, y'all'll see three doorways. Each leads to something different.
- The left doorway leads to a room with a whole lot of platforms. You tin can hop your fashion through it, but you'll have an easier time if you wait until afterward you get an item from the right doorway. On the lower path you'll find a Unicorn Horn in a chest; on the upper path is a monster that you can kill for a Xinopherydon Claw. The Horn increases your healing powers, while the Hook doubles the assault strength of whatever weapon you're using.
- The middle doorway leads to a behemothic teapot with a ridiculous amount of health. The only thing you can practise is sit and wail abroad on it until it'southward gone. I recommend waiting until you have the Scythe, the Octopus King'southward Crown with Obsidian, the Xinopherydon Claw, and a ton of Berserker Potions. Cast Fireballs whenever y'all think of it to expedite the process; otherwise, leave your estimator alone for one-half an hour or so. Destroy the teapot to earn a Giant Spoon.
- The correct doorway leads to a room with a breast. Problem is, the chest is on a ledge that's veeeeery far off of the ground. It's not that hard to achieve, though it takes a while. All you need do is equip the Oct0pus Crown with Obsidian, expect for Octopus Kings to slowly fill the room, and utilize their heads to hop upwards to the chest. Watch to make certain your guy doesn't get trapped under the tide of octopi and you should be fine. In the chest, yous'll find Rocket Boots. These will allow you to basically fly, every bit you can jump . . . and so bound again . . . and then spring yet once more, over and over and over.
Castle's Archway
This level is a fleck of an endurance trial. The straightforward fashion to complete information technology is to constantly bombard the incoming knights with magic. Deadening the speed down so y'all tin heal as appropriate. Using Octopus Male monarch summons can aid, but they tin as well pile up and get in your way rather badly. Alternatively, Squeeze yourself and y'all'll pass right underneath the knights as they ride by. You lot'll need roughly 500ish HP to get by the level either way. If you're lucky, you can find a Knight Body Armor while killing the knights.
The Castle
This place is a little unlike from usual, every bit information technology has a map to search for. Permit's explore!
- There's an Oven in the cardinal room. For 100 candies and ane chocolate it will make you a Pain au Chocolat. Throw this into the Wishing Well for some fancy power boosts.
- There's a giant spiked pit in the bottom room on the left. Owies.
- The eye room on the left is darkened. Click the middle of your screen to light a fire. Beside the fire is a Pitchfork which will triple your lollipop production. Score!
- The top room on the left has a huge, foreign, invincible creature that wants to protect its eggs. The second you and so much as touch ane of the eggs, the thing will fall down and crush you. Instant death. Plough off all of your attacks and summons, strap on the Rocket Boots, and advisedly wing over to the chest on the left side of the room. The hardest part of this is landing without falling down on height of the chest. Inside information technology is an L Stone.
- On the right side of the ground floor is a nougat monster. When you enter battle information technology volition be asleep, but after doing enough harm it will come to life and amble over to y'all. 1 hit and you're pretty much toast. Seems tough, just equipping the Boots of Introspection, the Summoning Tribal Spear and the Octopus King Crown with Obsidian will create a massive room total of buffering cronies to protect yous. They'll kill the affair before it tin can become you to. You tin't practise anything with The Tower beyond just nevertheless, but, hey, why not kill the monster now? It's worth a ton of processed.
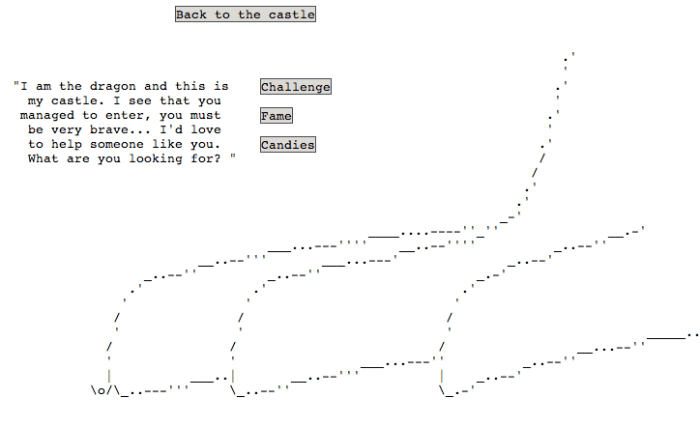
All done? Then head north. In that location's a dragon waiting, only it's not interested in fighting. It will give y'all a series of challenges to tackle; they're listed below.
Don't worry—he's non every bit tough as he looks.
Claiming: The Devil
Welcome to Hel . . . somewhere bad! The Devil awaits on the contrary side of several lava pits, constantly launching fireballs at you, and a giant bat thing drops more minions from overhead. Yous tin can try to bosom your way through past Rocket Booting beyond the lava and using magical projectiles on the thing on the way, just it's much easier to use the Boots of Introspection to remain firmly on the far terminate of the lava. Employ the Monkey Wizard Staff (Enchanted) and the Black Demons spell to striking the Devil from afar without exposing yourself to much impairment. Take the Devil out to earn an A Rock and a ton of candies.
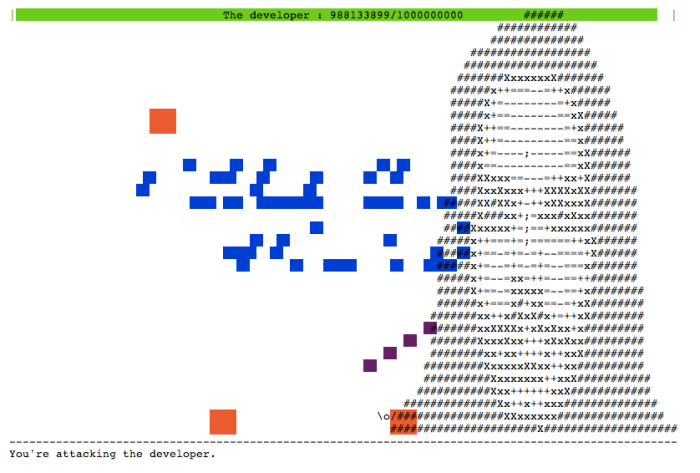
Fame: The Developer
Hoo boy. No less than the Developer himself has come out to play. The homo's very words will turn into attacks. Fortunately, this guy is not equally tough as he looks, for despite his massive amount of HP your attacks will calibration to run across the challenge. However, y'all'll want to outfit yourself with every detail that maximizes attack damage, as well equally equipping the Scythe and not equipping the Enchanted Knight Body Armor. Upgrade your attack forcefulness with a few Pain au Chocolats for expert measure out, brew some Berserker Potions, then go to. If you lot accept over ane,200 or so health you'll survive the outset onslaught, and then with the Berserker Potion active you lot'll kill the Developer before he can bring y'all downward. You'll earn the Y Stone for beating the Developer.
Candies: The Lighthouse
The dragon's 3rd option is candies, and lots of 'em. He'll suggest yous encounter his friend, the cyclops, which is The Lighthouse itself. Visit The Lighthouse after talking to the dragon and ask the cyclops the advisable question. He will pose you a puzzle. It's very, very circuitous, and, uh, I'll admit that I couldn't solve it on my own. Here'due south the solution. (Thanks, Candy Box wiki. You're pretty great.) Completing this puzzle will earn you the P Rock.
The Tower
Later collecting the 4 Stones—P, L, A, and Y—return to the Castle and enter the Belfry. Insert the Stones into the 4 niches at the top to make A Talking Candy appear on the pedestal. This is the final particular in the game, and volition allow y'all to open the elusive Processed Box. Woo! You won the game!
Post-Game Content
After opening the Candy Box, you'll unlock a few new menu items.
- Inside Your Box!: Run into for yourself.
- The Figurer: Allows you to enter a variety of commands to encounter what will happen. Here's a full list of things yous can enter. Most of the commands give you simple, light-headed responses.
- The Arena: This section contains a few custom areas created past exterior programmers. Not many as of this writing, but that's sure to change with time. You can besides use this page to admission Candy Box 2's Hard Mode. I assume you can play it before chirapsia the game, simply I recommend yous try the normal game get-go.
And, uh, that'south pretty much it. Huzzah! All that'southward left . . .
Information technology'due south time to get cooking.
Brewing
Here's a bit of potion-making. Once you lot get the Cauldron from the witch, you'll unlock brewing, which allows y'all to create a series of potions using recipes outlined in the instruction manual. All are handy in their own way, though unlike the commencement game yous aren't hobbled horribly if you don't rely too much on potions. (Most of the time, anyway.)
Listed below are descriptions of each of the potions, and how they're made. Note that yous can multiply the number of ingredients listed to make multiple potions in a unmarried brewing. The only exception is the X Potion, which must exist made 1-at-a-time.
Wellness Potion
Simple and important, the Health Potion restores your HP when used during a quest. They are always useful.
- Put a minimum of 100 candies in the cauldron.
- Mix for 5 seconds.
- Put the brew into bottles.
Turtle Potion
Another returning histrion for the start Candy Box, the Turtle Potion transforms y'all into a turtle for a little while. You move much more slowly, but you're also highly resistant to attacks.
- Place 50 candies and 500 lollipops in the cauldron.
- Mix for ten seconds.
- Stop mixing.
- Add 50 more candies.
- Mix for 5 more seconds.
- Cascade the brew into bottles.
Anti-Gravity Potion
Ooo, negation of physics. Drinking the Anti-Gravity Potion volition cause your little guy to ignore gravity for a few seconds and safely wing over pits. He will likewise continue to float at the top of a spring until the potion wears off. This is only really helpful until you go the Rocket Boots, afterward which the Anti-Gravity Potion is kinda useless.
- Put 1,000 candies in the cauldron.
- Boil the cauldron until it is lukewarm.
- Terminate heating.
- Add together another 1,000 candies.
- Heat once more, but this fourth dimension go all the fashion into the boiling point.
- Pout the brew into bottles.
Berserk Potion
Mmmm, actress attack power. The Berserk Potion eats up half your wellness upon use, merely the tradeoff is that you become an unstoppable killing automobile for a footling while. So long as y'all have a solid regeneration cycle, the Berserk Potion is a huge boon to late-game battles.
- Add together 20,000 lollipops to the cauldron.
- Mix until your arms starting time to hurt. (Yeah, this is a prompt that comes upwardly. It takes a full minute of stirring.)
- Bour the brew into bottles.
If y'all go against the instructions and add together at least a single processed to the mix you'll get a Cloning Potion instead. This will create an exact copy of your player to battle alongside you, though at a greatly reduced corporeality of ability.
P Potion
The commencement few P Potions you drinkable volition likely be beneficial, restoring health. Keep going, though, and a more farthermost random element volition step in, sometimes stealing health, sometimes casting random spells, sometimes transforming you lot into a turtle. Y'all tin can never tell exactly what will happen. My only advice is that you not utilize a P Potion while wandering about as a turtle, since the effects are never skilful.
- Add 500 candies to your cauldron.
- Mix for 4 or v seconds.
- Stop mixing.
- Add a number of candies equivalent to the number of seconds for which you mixed. If yous mixed for four seconds, add together 400 candies. Mix for five, add together 500 candies.
- Boil the cauldron until it is lukewarm.
- Stop boiling.
- Add a supply of lollipops. I add the same number of lollipops as candies in the fourth pace, and information technology ever works; not sure if that's required, however.
- Mix for 5 seconds.
- Put the potion into bottles.
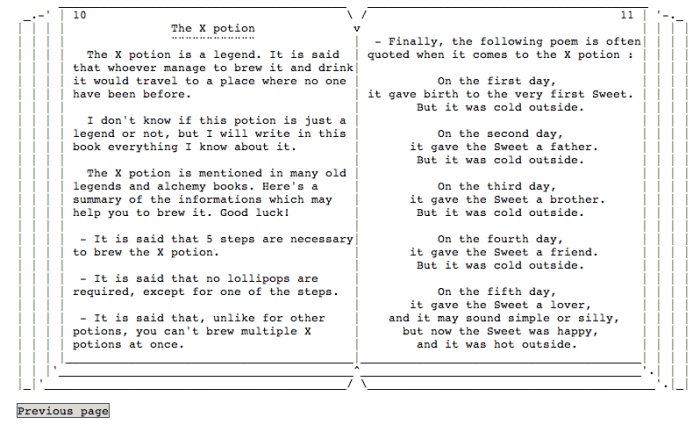
X Potion
The X Potion is a potion of legend, and ostensibly the most difficult to mash, given its cryptic directions. Fortunately, it's not that difficult to create.
- Put i candy in the Cauldron. Hitting Boil, then immediately hit Finish. You need to stop information technology while the water is all the same cold.
- Practice this three more times.
- Put one lollipop in the Cauldron. Heat the Cauldron all the way to boiling.
- Cascade the potion into bottles. Instant X Potion!
The X Potion is unique in that information technology volition teleport you to a boxing with yourself upon consumption. Y'all cannot win this boxing unless you're wearing the Octopus King Crown. Defeat yourself and you'll earn the Boots of Introspection, which stops you lot from moving when yous enter a quest. This is much handier than it sounds. You'll likewise earn ane-tenth of your current candies, which can add up to a ton of candies belatedly in the game.
Helper on September 12, 2018:
You tin can also purchase the sorceress hat for i billion lollipops!
MagnaSHAKE on April 28, 2018:
At the Berserk Potion it says ''Bour the mash into bottles'' and at the Anti-Gravity Potion it says ''Pout the brew into bottles''
brianna on February 24, 2018:
took me effectually thirty minutes to shell giant teapot using carmine enchanted glove scythe knight body armor merchants hat and boots of introspection I used 2 pains au chocolat to improve spell &potion countdowns and a black hole have xinopheridom claw and all the colored fins
brianna on February 24, 2018:
instead of fighting the knights on castle gate used rocket boots flew over them. I solved the puzzle myself information technology'south pretty simple just use trial and error then you go to a point where u don't accept to reset later on a wrong move.
wootwoot on July nineteen, 2017:
y'all must wear a non enchanted octopus king crown
userofcandybox on June 02, 2017:
how do I win the battle with the ten potion? I keep dying fifty-fifty with the octopus crown and health potions. Any advice?
Sabian on April xiv, 2017:
When I fight myself thru the 10 potion, I can't gte the boots of introspection considering I die. How do i solve this problem?
People on March 16, 2017:
Hey , umm how do yous become into places, like the shop or the forge, on this game ? I only started playing information technology and can't figure it out.
Kevin on November 25, 2016:
The pigsty is easy, All y'all need is the pogo, feather and teleportation spell, utilize the teleportation when you cant become out of certain situations.
Whathashappenedtomylife on January 18, 2014:
I personally found the Black Demon spell to be more useful confronting the giant teapot than the Fireball spell. Just brand sure you lot won't dice from the moving ridge of demons when they pass past.
someguy on December 27, 2013:
they are always in that location
pk7 on December 22, 2013:
Unfortunately I've bought the advanced grimoire first. Now I have both, but how can I switch between them? I'd similar to make the teleport spell (beginners grimoire).
ShadowCreations on December 07, 2013:
the foreign stones are a map. Tin can you lot solve information technology? xD (SPOILER: It stands for a treasure map, under i of the trees close to the hamlet
Cleverbot on Dec 02, 2013:
In the cave, what do the strange stones exercise?
Shiki on November eighteen, 2013:
The witches hat boosts your potion and spell ability
Tine on Nov 16, 2013:
What does the lid of the witch?
You can buy her hat for ane 000 000 000.
leeker on November 16, 2013:
it took me more 4 hours to destroy the giant teapot
Yupei on Nov 15, 2013:
Leather boots exercise non upgrade to anything. The arcade games requite huge payout if you lot go to a certain score threshold. Fireball gloves make short work of the ogre. Turtle potion is recommended to bet octopus. Employ antigravity potion to get over spike in pigsty. Use tribal spear instead of octopus crown to get rocket boots-it'south much easier using the warriors because they run straight, octopus can spawn moving either manner. Rocket boots are unnecessary against the ceiling spider. Unequip everything and just walk over the eggs, the spider does non aggro if you walk on them.
Don't carp getting the mill or alligators. They're a waste of resources.
Source: I wrote the first speedrun guide, and had a conversation with the developer, mainly most arcade strategies.
Yupei on Nov xv, 2013:
Shell powder is not obtained by killing a shark. Keep your eyes on the sea floor and yous'll run beyond a "shell" like hung made up of asterisks.
BEEZKNEEZ on November 11, 2013:
Cheers for the processed box walk through. This was very useful.
lopezhatintibleat.blogspot.com
Source: https://levelskip.com/rpgs/Candy-Box-2-Walkthrough
0 Response to "Baby Doll Candy Machine and Safe Box Surprise Eggs Play"
Post a Comment